Friday, March 9, 2012

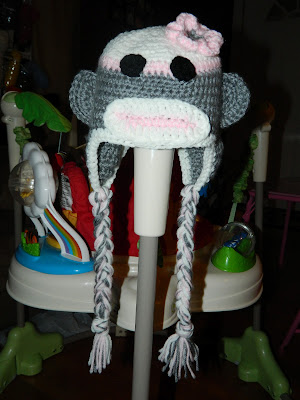
Free sock monkey hat pattern size 3-6 months

 Size 3-6 months
I used a size H hook 
the white yarn was a yarn I bought at a yard sale and it didn't have a sleeve on it. It felt pretty thin. The gray yarn is caron simply soft. The pink is red hart super saver 


Abbreviations
ch- chain
hdc- half double crochet
sl st- slip stitch
st- stitch
beg st- beginning st
hdc dec- half double crochet decrease 
dc- double crochet

Hat
Chain 3 join with beg st to form ring
R1 10 hdc in ring, sl st to beg st.
R2 ch 1, 2 hdc in each st around
R3 ch 1, * 2 hdc in next st, 1 hdc in next st., repeat from* around, join with sl st to ch1
R4 ch 1, * 2 hdc in next st, 1 hdc in next 2 st., repeat from * around, sl st
R5 ch 1, *2 hdc in next st, 1 hdc in next 3 st., repeat from* around, sl st
R6 ch 1, *2 hdc in next st, 1 hdc in next 9 st., repeat from* around, sl st
Switch to pink
R7 ch 1, 1 hdc in each st around., sl st
Switch to grey
R8-14 ch 1, 1 hdc in each st around., sl st  Do Not cut go on to the first earflap


Earflaps
R1 ch1, hdc in the next 13 st
R2 ch1, turn, hdc dec in the next 2 st, hdc in next 9 st, hdc dec in last 2 st
R3 ch1, hdc in next 11 st
R4 ch1, hdc dec in next 2 st, hdc in next 7 st, hdc dec in last 2 st
R5 ch1, hdc dec in next 2 st, hdc in next 5 st, hdc dec in last 2 st
R6 ch1, hdc in next 7 st
R7 ch1, hdc dec in first 2 st, hdc in next 3 st, hdc dec in last 2 st
R8 ch1, hdc dec in first 2 st, hdc in 1 st, hdc dec in last 2 st
R9 ch1, hdc dec in next 3 st, ch1 and tie off
Second earflap- count 10 st from first st in first earflap. Attach yarn on 10th st with a sl st, hdc in same st and repeat instructions from first earflap. 


Eyes
with black
Chain 3 join with beg st
R1 6 hdc in ring tie off. Leave string long enough to sew on hat


Mouth
with pink chain 12
R1  sc in second ch from hook, sc in next 10 st
R2 ch1 and sl st to beg st on other side, tie off
switch to white
R3 sl st in middle, 1 dc around except the 3 st on each end do 2 dc in them tie off leaving string long enough to sew on hat


Ears
with gray chain 4 and join with beg st to form ring
R1 5 hdc in ring, ch1, and turn
R2 1 hdc in same st, 2 hdc in each st around, ch1 and turn
R3 1 hdc in same st, 1 hdc in next 2 st, *2 hdc in next st, 1 hdc in next 2 st., repeat from * around, ch1 and turn
R4 sc around tie off, leave string long enough to sew onto hat
with

Flower
with grey chain 3 and join with beg st
R1 10 hdc in ring sl st to beg st
R2 *ch3 skip a st and then sl st to next, repeat from* around sl st to last st
Switch to pink
R3 ch1 dc in the ch 3 section until it covers all gray ch1 and sl st to gray sl st and repeat around  ( sorry for the horrible instructions, going by memory with this one) 

Braids
Cut long strips of yarn and pull through st on bottom of the earflap. Tie in a knot and braid to however long you want tie and trim ends

sew the ears, eyes, and flower onto hat and enjoy! 
Good luck! I hope this is easily enough for you to understand. Let me know if you have any questions! Enjoy


Thursday, March 8, 2012

Here are some of items I have made on real live babies! They look much better on these kiddos then laying on my couch haha. In the first pic I made this set last year and I wish I could remember where I found the pattern to that bunny hat but I don't have a clue where I got it haha. The second pic I showed the finished hat on a previous post laying on my couch. Looks much better on this cute little baby girl. The third photo is just another owl hat I made. My friend Jessica bought these from me to use as photo props. Her photo facebook page is here Check it out!!
                          Soon to come!! My first ever FREE pattern!
As soon as my slightly sick, very fussy, no nap taking toddler goes to bed I will type up my girls sock monkey hat pattern that I made. Beware the fact that I have never wrote a pattern so im pretty sure it will be horrible haha! Hopefully someone might be able to actually understand it and make this cute little hat lol 
This is a blanket I'm working on. I purchased lion brand homespun yarn to try it out and this was the pattern that was on the back of the sleeve. The link to this pattern is here I have it folded in half in this photo so it's getting pretty big. It's a super easy pattern and a beginner can easily get this made. It takes a while though.
This is a little puppy dog hat I came up with and of course didn't write it down. If I make another one I will try and make a pattern for this one too. The only thing I don't like about it is that I wish I wouldn't have put the fur around the edges it looks cute but it tickles Kaylin's face a little and she usually ends up pulling it off her head lol.
I LOVE this hat! I wanted to make Kaylin a kitty cat hat since she loves cats so much. Unfortunately when I came up with this I didn't write down what I did. I will be making another one soon to sell to someone and I will try and remember to write it down so other people can make one too! When Kaylin wears this hat I get so many compliments on it. I think it's the fur that people really like.

Friday, February 24, 2012

Free owl hat pattern

This very cute owl hat is so popular! Everyone just loves it. I do too and so does Kaylin. The very first owl hat I ever made I went by this Free pattern Free owl hat pattern (this also has a baby cocoon pattern with it as well.)I learned how to even attempt on owl hat by using this pattern. The one I made in this picture I didn't follow a pattern I just did my own thing using the knowledge I learned from making the first owl hat. The things I did differently are obviously hat type I made just a plain ear flap hat with different colored edging. I made the eyes bigger by doing more increases. The beak is a little bigger. The ears are basically the same though. If you are new at crocheting then I would suggest trying out the free pattern first and then trying one on your own. Of course you can still do the free pattern and put your own touches on it. If you have any questions on the owl hat I made just let me know.